Vegan Sausage Balls

8837B238-EAD0-4484-8C66-DC6449E11464.jpeg

Okay. First things first. Go ahead, giggle. I know you want to.

It’s all right, I won’t tell.

You good? Cool, moving on then.

It’s that time of year again, and my mom and sister are on a Christmas candy making bender.

I’m not even kidding. You do not want to see the grocery bill, or the kitchen. All the things. Allllll the things.

I’ve managed to tweak a few of the recipes to be vegan friendly, and a few are accidentally vegan, so that’s always fun. (A note on that at the end of this post..) The resulting sugar rush though? Not always awesome.

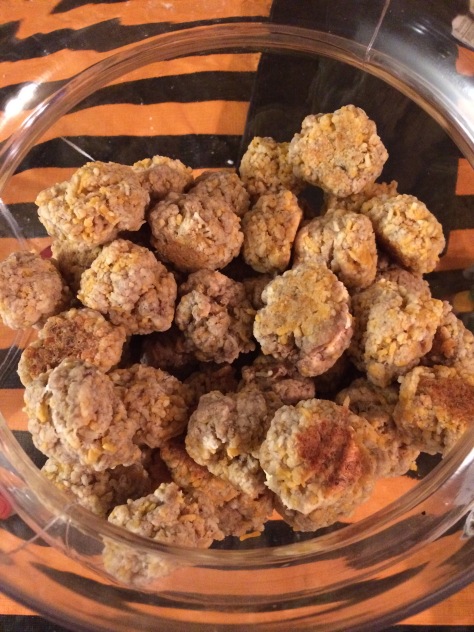
That, however, is why God invented sausage balls.

These things are amazing. Especially dipped in mustard. And anyone who says differently, can fight me. And I’ve got a tattoo. So, uh, you don’t want to do that. (Translation: I will cry if you fight me. Please don’t.)

It was one of the things I didn’t immediately think about finding a vegan version of. I mean, “sausage balls” sounds inherently anti-vegan, no? But somewhere in between the many iterations of biscuits and gravy, we found LightLife sausage.

The texture isn’t exact… but it’s darn close. And workable like “real” sausage.

And cheese? That one was a no brainer. Lately our go-to is Follow Your Heart Cheddar shreds; but this is one of the few recipes that I’d consider reaching for Daiya first. Specifically, the pepper-jack shreds. Because spicy. But if you aren’t heat person, stick with FYH.

Again, the end result isn’t exactly the same as the regular, omni sausage balls- but I’ve fed them to several people – vegan and omni- with no complaints.

Veggie subs can be fairly expensive; especially if you’re on a budget or paycheck to paycheck, so unless I catch them on a sale, these are usually reserved for special occasions only.

A few notes before we get into it. This recipe calls for Bisquick. Not all Bisquick products are vegan! Here’s a link on that. You can also make your own, if you’re so inclined. But I’ve never tried! (Also- low carbers- my friend Regan informs me there’s a low carb version as well? I’ve never tried, but you can find it here.)

Worcestershire. As a rule, it isn’t vegan. Vegan brands exist, but lordy are they pricey. Recipes abound online though, check out Vegan Kitchen Magick’s recipe!

All set? Okay, here goes.

Vegan Sausage Balls:
Makes: a ton. I am not a food blogger, sorry guys. Usually about three cookie sheets worth. Soooo. 40-60 depending on size? (No comments. That ones low hanging fruit.)

3 Cups Bisquick
1 pkg LightLife Gimme Lean Sausage
1 pkg Vegan Cheese Shreds
3T Vegan Worchestershire Sauce
Dash of Frank’s Red Hot. (Or 3. Or 6. Who’s counting?)

Pre-heat oven to 325 degrees.

Combine everything the best way possible. It won’t be pretty. And it’s going to be a bitch. No need to mince words. I use a mixer with a bread hook for the bulk of it, and mix with a spoon by hand – my childhood self would have KILLED for this option.

No matter what, you’re likely to have to mix it as you scoop the balls, Bisquick and cheese shreds will fall to the bottom. It’s just how it goes. I cheat sometimes and use less Bisquick and cheese, eyeballing it, but that’s hit and miss, if we’re being honest.

Scoop out small balls, maybe a tablespoon or two in size, (please. Do whatever. I eyeball these and make them 1-2 inches in size? As long as they aren’t giant, don’t sweat it.) Shape them into pretty round spheres, and put on a cookie sheet. Preferably with parchment paper or a silicone baking mat or something. Mine always stick when I grease the pan.

Bake for 10-15 minutes. Usually I go with a solid 13, but it depends on the oven and all that. The bottoms will be slightly brown, and I mean… between you and me? It’s not actual raw meat, so let’s be real, you’re going to eat one to see if they’re done, aren’t you? Thought so.

Let them cool a bit, maybe on cooling racks if you’re fancy, and then you’re good to go!

They’re great for parties and potlucks. Just… be warned you might end up roped into making them often if they go over well. 😉
They also reheat well, and if you like that sort of thing… they aren’t awful cold. So they make great holiday presents!

Let me know if you guys try them, would love any feedback!

Also, I’m seriously debating trying to fine tune the rest of my mom’s Christmas recipes, and maybe making a digital cookbook? Not 100% sure yet, though. What do you guys think? Wouldn’t anyone be interested?

If I decide to be that ambitious, I’ll be sure to share it here.

Vegan Divinity Recipe!

Yeah,   I know. It really doesn’t seem possible. But stick with me. It really is.

I haven’t had divinity in years.  (Though, to be fair, only a year of that is due to veganism. The rest of it can be chalked up to a severe lack of patience. If you’ve ever made – or tried to make – divinity, you know exactly what I’m talking about.

I’d googled a bit trying to find a vegan version – and managed to find one. It didn’t look even close to normal divinity though, as the flax it had you sub for the egg whites didn’t fluff or get “stiff peaks.” And, with divinity was something we used to make  yearly – I’d rather go without than to have a subpar substitute.

Luckily for me – someone a lot braver than I am found a substitute.  Aquafaba.

I forget exactly who discovered it, but my Facebook news feed has exploded in the past few months with people obsessed with this new way to make meringues.  Instead of whipping egg whites to get the desired frothy, stiff peaks, people were using bean brine.  Or, really, the juice you normally pour out of the can of chickpeas.   It sounds bizarre, and you’d think you could taste it (sometimes apparently you can. All depends on brand!) but apparently it works! The logic behind it is that the starch from the beans gets into the liquid, and that’s what makes it stiff when you beat it.

Well. I’m sure it’s loads more scientific than that… but thats the gist.

After lots of drooling on Facebook, I found this group Vegan Meringues on Facebook. And oh my gracious. Aquafaba is amazing. Marshmallows, cakes, macarons, meringues, nougat, royal icing… and so much more. It’s amazing.  And extremely intimidating, but that’s another story.

Seeing people post their “before” pictures of the meringues made me think . They looked EXACTLY like what my mom’s divinity used to look like.   So I posted a few times, and people seemed to think it would work – to just sub 2 tbsp ish of brine for each egg white.

So, I decided to try it. And lo and behold – it worked!!

Here is the recipe, and a few pictures.   Though, I’m not a food blogger. And I’m for SURE not a photographer , so be forgiving. 🙂  (Full recipe at the end of the post)

First, you start beating the brine. 4 tablespoons isn’t very much, so it will seem awkward at first.  But it will fluff up soon!

This. . . . .takes . . . ages. . .

While doing this- start the sugar, water, corn syrup and salt on the stove. You want to stir it constantly until the sugar is dissolved. Then you don’t stir. (I worry, so I stirred every once in a while. My mom said you don’t need to though.)  You let it cook until it reaches hard ball stage on a candy thermometer.   Then, you’ll add it to the mixer.

Now you’re about ready to add the sugar mixture. Beat a bit more, just to be safe..

When the chickpea juice looks like this ^ you’re good to go. I personally beat it a little longer. Because I’ve had divinity flop on me before – so now I’m paranoid.

Then, you s-l-o-w-l-y add the hot syrup – and PLEASE BE CAREFUL . IT”S HOT – and the vanilla.

Then, you beat it some more.

And more.

And more.

Seriously. You will be SO SICK of beating this by the time you’re done.

You want to beat it until it holds its own shape. It will take forever.

11156118_447609665405139_760979898088920677_n

When it looks like the picture above- you’re done!

Then, you spoon it out onto a sheet, and let it sit up. 🙂

Ta da!!

I was a little worried it would taste bean-y- but nope! It tasted exactly like I remember!  Both my mom and brother loved them. They are both VERY wary of vegan food – and are candy elitists.

I won’t go into detail about how I reacted to being able to make egg fee divinity. But I will admit it involved lots of screeching, dancing, and words that shouldn’t be repeated in front of small children or mixed company. 🙂

This makes me SUPER happy – I imagine it would be great for families with egg allergies as well! I’m going to attempt to try peanut butter rolls next – I’ll be sure to report how that goes! If you guys try it- please, let me know how it goes!

Divinity/ Divinity Fudge

2 C Sugar

1 C Water

1/4 C Corn Syrup

1/8 tsp Salt

4 tbsp Chickpea Brine

1 tsp vanilla

1/2 C Chopped nuts (optional)

Heat sugar, water, corn syrup and salt in a pot, stirring constantly until sugar is dissolved. Continue cooking until it reaches hard ball stage on a candy thermometer .  While doing this – beat the chickpea broth with a hand/stand mixer until it starts to hold a shape. And then, if you’re like me, beat for just a little longer.  (Whisk attachment)

Slowly add the sugar mixture and vanilla into the foamy beaten brine, and beat until stiff peaks. It’s super important that you get stiff peaks that hold its own shape. Otherwise the divinity won’t set up, it’ll melt into yummy, sugary puddles. Add nuts, if using, the spoon out in dollops onto wax paper.  (Or, put into a pan, and cut into squares. )

This is why reality tv is evil…

image

image

image

So many food shows!!!

Seriously. There is Food Network… All the fancy cooking channels on satellite… And even Travel Channel has a ton.

Usually themed ones too.. like, ‘World of Doughnuts,’ or, ‘Best Hot Dog, ‘ … Or, the one that hooked me… A specialty pie show.

One of the stores featured… Only sold key lime pies, and key lime flavored things.

Key lime is my ABSOLUTE favorite. And I haven’t had any in ages.:(:(   

Here’s where the trouble started..

My friend Meagan had a recipe from America’s Test Kitchen.. which she was nice enough to share. It looked easy enough …… So Mom and I decided to try it.

The crust was easy enough… But I’m awful at graham cracker crust. Can never get it on the sides of the pans… So my mom went behind me & fixed my crust.

Of course , if I had read the recipe more closely … I would have seen that the technique they use looks SO much easier… Oh well. Live and learn…;)

Filling was easy… Except that we didn’t have the best equipment for grating the zest, or juicing the limes.. so… Lots of make shift stuff going on.. and then realizing our zest was too big… Trying to chop it smaller… Then we enlisted child labor to squeeze limes.(well?? They liked it!)
The homemade whipped cream was easy, though. Loved it.( now that mom has a mixer…& we didn’t have to do it by hand…)

Chilling for 3 hours, not so fun though.:(

Came out great though, so… can’t really complain.

Recipe:
——
Key Lime Pie

Lime Filling
4 teaspoons grated zest plus 1/2 cup strained juice from 3 or 4 limes
4 large egg yolks
1 (14-ounce) can sweetened condensed milk

Graham Cracker Crust
9 graham crackers (5 ounces), broken into rough pieces
2 tablespoons granulated sugar 5 tablespoons unsalted butter, melted and warm

Whipped Cream Topping
1/2 cup heavy cream, chilled
1 tablespoon confectioners (powdered) sugar
1 teaspoon vanilla extract

For the filling: Whisk the zest and yolks in a medium nonreactive (not metal) bowl until tinted light green, about 2 minutes. Beat in the milk, then lime juice; set aside at room temperature to thicken (about 30 minutes).
For the crust: Adjust an oven rack to the middle position and heat the oven to 325 degrees. In a food processor, process the graham crackers until evenly fine (you can also crush them in a ziploc bag). Add the sugar and pulse to combine. Continue to pulse while adding the warm melted butter in a steady stream; pulse until the mixture resembles wet sand.
Transfer the crumbs to a 9-inch glass pie plate and evenly press the crumbs into the pie plate. Bake the crust until it is fragrant and beginning to brown, 15 to 18 minutes; transfer to a wire rack and cool completely.

Assemble the pie: Pour the lime filling into the crust; bake until the center is set, yet wiggly when jiggled, 15 to 17 minutes. Return the pie to a wire rack; cool to room temperature. Refrigerate until well chilled, at least 3 hours.

For the whipped cream: Whip the cream, vanilla, and sugar in the chilled bowl of a mixer to just-stiff peaks. Spread the whipped cream over the filling evenly.

Black Bean & Rice Stuffed Poblano Peppers

Mmm. Ok. So, we usually don’t go all out and cook dinner at our house. Knorr noodles, pizza, oven baked seafood & fries and other dishes are much more our area of expertise. Granted, there are a few exceptions… Matt makes a good (and insanely time-consuming) seafood alfredo, we have crock pot tortilla soup down to an art, etc…

But, I picked up some poblano peppers from the store the other day, so Matt went around and found a recipe for stuffed peppers. It looked really good, so we decided to try it last night.

We used this recipe, (which, has nutritional info on it as well.) Only, we doubled it, and used salsa from our favorite Mexican restaurant instead. (And well, got twice as much salsa as we needed… so we were forced to snack on chips and salsa while we made dinner. Poor us…..)

Also, instead of the brown rice, we made Instant Rice, with chicken broth. Not sure how the brown rice would have been, but some commenters on the recipe page stated it was better with the white rice. Probably lost a bit of nutritional value there, but not enough for me to lose sleep over. 🙂 (K. We skipped the reduced fat cheese in favor of the regular stuff too… it’s still a healthy dish though, right? )

Terribly easy to make! Although, I wouldn’t double it. It could have been our snacking on chips, but one stuffed pepper filled us up perfectly. Now, we have leftovers for today! Here’s hoping it heats up well…

I’ll leave you guys with the recipe. Just…. don’t do like I did and scratch your nose, touch your eyes, or do anything stupid like that after handling the pepper. It’s not a jalapeno… but still spicy enough to make you wish you’d worn gloves….

Ingredients:

2 large poblano peppers*

1/2 (of a 15-1/2-ounce) can black beans, rinsed and drained

1/2 cup cooked brown rice

1/3 cup mild or medium chunky salsa

1/3 cup shredded reduced-fat Cheddar cheese or pepper Jack cheese, divided

*Poblano peppers can sting and irritate the skin, so wear rubber gloves when handling peppers and do not touch your eyes.

Recipe:

-Preheat oven to 375°F. Lightly spray shallow baking pan with nonstick olive oil cooking spray.

-Cut thin slice from one side of each pepper. Chop pepper slices; set aside. In medium saucepan, cook remaining peppers in boiling water 6 minutes. Drain and rinse with cold water. Remove and discard seeds and membranes.

-Stir together beans, rice, salsa, chopped pepper and 1/4 cup cheese. Spoon into peppers, mounding mixture. Place peppers in prepared pan. Cover with foil. Bake 12 to 15 minutes or until heated through.

-Sprinkle with remaining cheese. Bake 2 minutes more or until cheese melts.

Chicken and Red Pepper Alfredo

It’s crazy. I have cooked more this weekend, than I have practically a month.

And everything came out good- which is sort of a miracle in itself. Especially when one recipe is one of those “Hey!! Let’s try this and see what happens!!”  Those can quite often be mini-nightmares….

But, this chicken alfredo I made, turned out absolutely amazing, so I thought I’d share the recipe. 🙂 (not, that I’m a gourmet chef or anything, but hey.Food is food, yes?)

Chicken & Red Pepper Alfredo

ingredients

  • Chicken of your choice (we used 3 thighs, to feed 4. Boneless is probably best.)
  • Onion (we used white onion, and maybe 1/4 of an onion.
  • Mushrooms – 1 small can of pieces/stems
  • Red Pepper  – 1
  • Alfredo – 1 Jar
  • Noodles – your choice. (we used heart healthy spaghetti.)
  • Salt , Pepper, Minced Garlic, Italian Seasoning (we used McCormick) Cayenne Pepper (all to taste.)

We put a little vegetable oil and minced garlic in a skillet, and let it heat up while we cut the chicken into strips. Then, we added a little salt, pepper, and italian seasoning. Then, added a generous amount of Cayenne Pepper.

When the chicken was close to being cooked all the way, we tossed in the onions and red peppers, and started water to boil for the spaghetti noodles. When we could tell the chicken was finished cooking, we added the mushrooms and alfredo sauce, and put the noodles in the water.

Basically now, all that we had left to do was simmer the sauce until the noodles finished cooking. It came out absolutely fantastic! Even my niece and nephew, who are extremely picky, tasted the sauce, and loved it.  The cayenne pepper gives the alfredo sauce a slightly different taste, so it works out great. (Only, if you do like I do and pour seasonings into your hand…. be sure to wash your hands after the cayenne pepper, and before touching your eyes, or eating any of the extra mushrooms pieces… it’ll burn!!)

I also kinda wanna try this recipe steaming all the veggies, and adding them in when the sauce is cooked. (Like, if you’ve ever eaten at Pei Wei… the Thai Coconut Curry… I would love my veggies that crisp, mmm.) But, I don’t really have any complaints on how this turned out!  And, we made pre-made garlic bread from Aldi. I believe it was Rosemary Parmesean…. Mmm. ❤

K. Enough drooling for me. Gotta go round laundry together, and eat some leftover cinnamon pancakes!